Wednesday, August 14, 2013

Freezer Cooking

If you follow any blogs, have a Pinterest account, or look at your Facebook feed, you've probably heard of freezer cooking. I've been freezer cooking for a couple years now, but how dedicated I am to using my freezer meals changes constantly. Right now we're renting a place without a dishwasher.... As much as I love cooking, I am NOT okay with washing several pots and pans every night. So now, I almost exclusively cook from my freezer. I was asked to give a little talk about my freezer meals during a meal planning & cooking night for my church's women's group. I brought along a new favorite FM of ours, and had a lot of requests for the recipe. I also had a few women who thought freezer cooking sounded great, but wanted to know where to start. I realized that most of my recipes are my own, or some that I can't remember their origin. So I thought I'd add some to my Pinterest page, so I'm posting them here first.

Sorry the pictures aren't great. It's midnight, and I just opened my freezer and snapped a couple shots.


Want any easy way to save time every morning? Try freezing your sandwiches. We do bread, deli meat, and cheese. I've read you can also do small amounts of condiments like ketchup or mustard (put between meat & cheese, not next to the bread). PB&Js freeze too! Wrap sandwiches in plastic wrap, then put in freezer baggie. (Apparently, this baggie is not a freezer baggie. Well, the double wrap worked!) Drop in a lunch box in the morning, and sandwich will be thawed by lunchtime. 


My husband LOVES soup. I'm not a huge fan. So I decided to make him soup for lunch! Use chicken or beef stock (I mixed one of each), add whatever veggies you have on hand. (I used baby carrots, mushrooms, celery, and canned corn) Bring to a boil then simmer for 30 minutes. Once cool, pour into jars or bowls and freeze. Defrost in fridge the night before (or let defrost in lunch box then microwave at lunch time)


Mini Corndog Muffins: These are super easy, but taste great! They can be time consuming, so I prefer to make them in a big batch. 
1 Box of your favorite cornbread mix (I use Jiffy) 
5-6 Hot Dogs
Honey
Mini cupcake liners (to save time)
Eggs/Milk, according to cornbread package. 
Follow the directions on your cornbread mix to make the batter. Add 11/2 TBS of honey to the batter and stir. This gives the batter a sweet taste, and keeps the muffins moist through freezing and reheating. Slice hot dogs into 5-6 pieces. 
Preheat your oven according to package directions.
Line your cupcake pan (you can also grease the pan, but liners save time)
Fill liners halfway with batter 
Then add your hot dogs to the center of each cup. 
Bake according to directions (check them regularly for the last 5 minutes, since they are much smaller than normal. After a couple of batches, you will know how long to bake them)
Let cool, then flash freeze in the pan, or on a cookie sheet. Once frozen, place in a freezer baggie. 
To eat, microwave for 30 seconds.
These should last about 3 months, but they never stay in our freezer that long. One box of cornbread makes about 24-30 mini muffins. 

Again sorry for the bad pics! I will start keeping track of how I prep and cook my meals. I never like to stick to recipes, but I will work on that so I can share the ones we like best with others.

-DearLadyDisdain


Monday, July 8, 2013

Duct Tape Wrapped Picture Frame

I made a stop at the craft store to pick up a couple items, and score! they were having a sale. Their Duct Tape was on sale. I grabbed two rolls of Redskins tape for 50%! (That came to $10 for both)  While I was waiting in line, a lady asked me if I was going to make a wallet with the tape. I know I can pass for a few years younger, but I had no idea I looked 13! I honestly wasn't sure what I was going to do, I just thought it looked cool and I would figure out something later. Of course I didn't say that. I just said the first thing that popped into my head.... "I'm going to wrap a picture frame with it!" She loved the idea and told her friends who also loved it. So, it was settled. I was going to decorate a picture frame with duct tape.

I did this in about 10 minutes, while watching TV.


I've never seen this done before, but I knew I wanted the frame to have a wrapped feel. It's going in a room dedicated solely to the Skins, so we don't need to see the logo or team name on the frame. 


Wrapping the tape around the frame would have made it too bulky, and would make it harder to get the angle I wanted. So instead, I cut the tape into short strips. That also gave me some control over what part of the design would show. I wanted it to look random, but I did a little adjusting. 


I am so happy I got the background color of the art right! I don't like to steal other people's work, but I couldn't find the original creator of this design, so I made my own. Using just Microsoft Word starter, I made my own color maroon (score it worked!), decided on a font that I liked for the words, and arranged them. Then I cropped and added the logo. I printed it off at Staples for 50c. 


It turned out better than I thought it would, and I can't wait to see how DH likes it! 
("Hail to the Redskins" is the saying, hence the "Hail On") 


-DearLadyDisdain

Memory Shadow Box

After finishing our travel map cork board, I decide to finally make a memory shadow box like I've seen all over Pinterest. This took me a few minutes, and was so simple. The longest step was gathering the supplies.

You need


A shadow box. I snag these whenever I see them in good condition at thrift stores. I know this one says $1.91, but I bought it on a 50% off day! Can't beat a $1 project!


 Your memories. Most of the ones I found were from a few years ago, when I decided I was going to scrapbook. That didn't make it past three pages, but I did at least have all our little mementos well organized.


Embellishments. I decided to go with some stickers and scrapbook paper.


Step one: Apply a background to your frame. I used a green paper and glued it to the frame backing
Then add your embellishments. 


We don't go to many movies, so I didn't use the "admit one" quote that a lot of people use. Do whatever you want! It's your memory box!

Step Two: Add your memories! I had to restrict ours to tickets and wristbands only to keep it from looking too cluttered. 


Step 3: Hang!
Everything got a little shook up when I set the frame down on its side, but I gave it another good shake and got a new pattern! 

Here it is, next to our travel map. I love all the memories being in one place. 

A lot of tutorials call for cutting a slot in the frame (or buying one that comes with a slot already) I decided to go the easier route and just place them inside and close it up. I knew it would hang in the hall, and I was worried that too much dust would get into the frame if it had an opening on the top. But mostly, it just seemed like too much effort for a small convenience later.

It was such an easy project, I'm annoyed that I didn't get to it earlier! Now I have to go on a hunt to find all the other tickets we wanted to keep but didn't have a place for.

-DearLadyDisdain
Now you talk of a sheet of paper, I remember...

Cork Board Map of Our Travels

I love the look of old maps. So does DH. I always see adorable crafts on Pinterest with old maps, but I never got around to making one. Until this weekend.

EDIT: I got some requests for more info on this project, so I decided to add some more details!


DH picked up a pack of 3 laminated maps at a yard sale two months not that long ago. I planned on using one of those, but it was too big to fit on my bulletin board. It was also laminated and too new looking.

Then I remembered a stack of old travel maps we bought awhile ago. One of them was a National Geographic map of places to vacation. From 1966, it had just the look I wanted.


So here's the how to. (Sorry for the lack of photos)

Supplies:


  • Glue (I used a 4 parts glue, 1 part water mixture)
  • Paint Brush (I prefer sponge so no hairs get left behind)
  • Mod Podge (I used matte for sealing)
  • Straight pins (I looked at a few stores, then finally founds some at JoAnn Fabrics. I got the multi colored packs (on sale for $1.50), but they also have packs of all one color)
  • Cork Board (I've had mine for 10 years, and it was pretty beat up, but it worked great)
  • Map! The one I found that worked best was an old travel map, the kind that fold up.
  • Something heavy (to flatten out the creases)
  • Patience! 


Lay out your map over your cork board. Be sure that Maine to Florida fit. Place books or something heavy on the creases to flatten them. Leave over night (the hardest part for me)


Now to glue! This is when being a folding map really came in handy. I did one panel at a time. Apply glue to the cork, and to the map itself to be sure it sticks. Flatten it out. 


My board had a metal frame around it, which I left in place since it had hangers in the back. I then wrapped the map around the edges and glued it to the sides of the frame too. Add a layer of Mod Podge or other seal. Let dry. I still had some air pockets, especially at the top, from doing the edges before the part on the cork finished drying. Luckily it's a topographical map, and little bumps disappear into the mountain ranges. 


DH and I had a lot of fun placing our pins on the map. Red is for me; green is for him. Yellow is places we've been together. I wish there were more yellow dots, but I think we're doing good for having been together 5 years. You decide what warrants a pin. We were both in the military, and did a lot of cross- country travel. We decided airports or driving through doesn't geta pin. And no pin if you were too young to remember the trip either.  


All finished and hanging in the hallway. 


I absolutely love the way it looks! I can see the places where I messed up, but since there will be lots of little pins, I don't think it matters too much. The best part? This got us excited for planning trips to visit friends and family next year and looking for new places to stop along the way! 

-DearLadyDisdain

Tuesday, May 28, 2013

Getting Cheap Baby Gear Post #1

While out shopping at yard sales and thrift stores, Benedick and I often see amazing baby furniture for very cheap. This always brings up the conversation of how much our future little ones will cost us. Of course, we will want to give our children everything. But for us, "everything" includes a house to grow up in, a college education, and good financial sense. So splurging on the years they won't even remember is something we're not willing to do.
I once saw a tv program on how to avoid spending $10,000 preparing for baby. Wait. What? 10k prepping for baby? Looking online, I see that that number isn't so far out of line for many families. The show's main advice was less is more. Skip the changing table and the nice stroller. You really only need a few outfits of each size. Ok, that's probably good advice. But what about those of us who feel the urge to nest? If we have room for all the gadgets and gizmos, and if they will make life easier, why can't we have them?

I told Benedick that when the time for nursery decorating came, I would try to do it all for $1000. I have no idea why I came up with that number, but it sounded good in my head. The oldest in a large family, he very clearly doubted I could do it. So for the last 2 weeks, I've been taking note of anything baby related I found for free on craigslist. I didn't go out of my way to look for any of these items. I just saved anything I found on my normal checks of the free page.

In addition to many carseats (which should never be purchased used), I found several ads for unused diapers and unopened formula and baby food. Here are the pictures of what I found for free, all within a  30-40 minute drive, in 2 weeks. 


Dressers: There are always listings for free dressers, in a variety of conditions. I plan on using one as a changing table/storage combo. I found this one on the first day of my project. It would be perfect, and wouldn't need any work AT ALL. 


Strollers: Tons and tons of strollers. Some were obviously stock photos, some ads had no pictures. From easy-to-fold to jogging, I was impressed with the number of strollers for FREE.


Cribs: Now this is when you have to check for recalls, but I did find a few cribs.


High Chairs: As long as it's in decent shape, I see no reason not to get one of these for free. They're made to be washed down regularly, so you can give it a good scrubbing before your baby uses it.

 Toys & Play Mats: Toys are ALWAYS showing up free. Your baby is too young to beg for something on a commercial, so why buy everything brand new?


Blankets & Sheets: Who do we decorate nurseries for? The baby or the parents? As much as you really want the crib sheets that match the curtains and mobile, do you really need them? And are you going to buy two sets to swap when you do laundry?

A few other things: Again, these are all things I happened to see while browsing the free section. I didn't search for these. AND these are only the items that had pictures. 
Potty seat. 

Walker
Cute lamb seat 
Unopened Formula


I see a lot of rockers. I saved this one
because I had an aunt who used a glider
like this and LOVED it! 
So what would all this cost? If I got all this for free instead of buying it, how much of that average $10,000 would I save? I'm checking prices on the Babies R Us & Toys R Us website, and going with the cheapest, most basic product. 
Changing Table(I'm counting this, since it needed no additional work): ON SALE! $89.99 
Folding Stroller: ON SALE! $12.98
Jogging Stroller (DH loves to run, so this will be a must for us): ON SALE!  $79.98
Swing(you can see one in the stroller pics): $69.99
Crib: ON SALE $149.99
High Chair: $42.99 
Bumbo Seat: $44.99 
Pool: ON SALE! $7.99 
Playmat: $24.99 (and it only has a one star rating) 
Jungle Gym: ON SALE! $84.99
Basketball Hoop: ON SALE!(almost 50% off) $29.99 
Crib Liner: $29.99
Blankets: ON SALE! 4 pack- $9.98
2 Crib Sheets: ON SALE! (almost 50% off) $11.96 
Potty Seat: $9.99 
Walker w/ toys: ON SALE! $29.58
Animal Chair: ON SALE! 75% off (and a tv character) $20.98 
Glider: ON SALE! (and only one star rating) $159.99
2 cans of Formula:  ON SALE! $23.98

So, even shopping sales, and getting the cheapest item, that's a total savings of $935.32(plus tax) No, you certainly don't NEED all of these things. But you really can't beat free! 


I'm going to keep my eye out for other free baby things, but I think my next project will be to look for things that could be re-purposed for the nursery. I know we have a great vintage bookshelf that will make its way there, but what else can I find? 


-DearLadyDisdain


Wednesday, May 22, 2013

Do A Good Deed

I'm going to set a goal for myself now, to do at least one nice thing for someone every day. Now, I've thought about this before, but I always think "I don't even leave the house EVERY day. And what if I can't think of anything nice to do?"

But now I'm writing it down. online. I want to try to do something nice for someone every day. It can be as simple as smiling at someone, holding a door open for someone, or waiting patiently while the cashier tries to figure out the new computer system (this happened today).

The past few days, I've been organizing a lot, which means I'm at the computer, or in the living room, so I put on a show sometimes for noise. I found a playlist of The Ellen DeGeneres Show giveaways. I think watching that is a big reason I decided to commit to doing something nice everyday. I usually try to, but there's something more final about making it a "goal"

I'll try to share any interesting stories that come up, and any easy ways to make someone's day I discover. I'm not making it a condition, but I want to try to think of different nice things to do.


Today's Nice Deed that I'm going to do again and again.

I left this on the hooks of our mailbox today. The note says "It's hot outside! Have this water & stay cool. P.S. Thanks for the treats everyday! Our dog now loves all mail carriers!"

I wanted to put that last bit on because I wasn't sure if our mail carrier would know it was for her. That would the opposite of an act of kindness. More of an act of taunting. Here's this ice cold water, but it may or may not be for you so don't take it.
Our mail lady is awesome. She met Doctor Who (our dog) one day when he and DH were coming home from a walk. Since then, she leaves 2 treats on the mailbox. One day I found a treat on the box, but no mail inside. Doctor now hears her coming up the street and waits by the front door so I will get up and give him his snack.
When it first started getting warm, I asked DH if he thought it would be weird to leave a bottle of water out for whoever delivered our mail (for awhile we had a different person every day) He said not at all, and that his dad (who delivered packages) would mention how much he appreciated when people would give him water on a hot day. So, I bought a pack of water for $3.

Today was the first day it actually was hot, so I put a bottle in the freezer when I woke up. When I left for the day, I put it outside. It was still cold when our mail came around 2:30. We also don't use these drink mixes anymore, so I taped one to the note too.

I was home when the mail got delivered today, and I heard a man's voice muttering (I think reading the note) then "oh really? cool" I waited a few minutes before getting the mail, since our normal lady is done with the neighbor's and far up the street by then. When I peaked out, the man waved from the neighbor's porch. (Which I think means he took a minute to have a drink, which is great) He said thank you, and that our normal lady was out today, but he would tell her about the note. He looked like he was in his 60's and very sweaty. His smile totally made my day. But hey, wasn't this supposed to be about doing something nice for someone else?  I am definitely doing this every day. I might even do it on the not very hot days. Who says you can only be thirsty if it's hot out? By the end of Fall it might cost me, what $15? Maybe $20 if I buy drink mixes too. For me, that's a fair deal to make someone else's day just a tiny bit better.

Now how many days can I count this as my good deed before thinking of something else too? Hmmm 


-DearLadyDisdain
A kind overflow of kindness: there are no faces
truer than those that are so washed. How much
better is it to weep at joy than to joy at weeping!


Friday, May 17, 2013

Steampunk!

Or more accurately.
Proof that you can make a cheap steampunk costume that still looks great.


Earlier this year, DH and I decided to go to a fan con that was 3 hours away. Yikes! His cousins had a booth there, and we thought it would be great to see them and go to our first con. We decided to make steampunk costumes.

Other than a quick Halloween costume, I haven't had much experience in costume making. And I haven't tried to use my sewing machine yet. And besides making a steampunk inspired sketchbook for a friend's son, I had no experience in the steampunk world either.

With some ingenuity and a couple trips to the thrift store, I made both our costumes for around $30.

This is not a normal "how to" tutorial. You can't make the exact same costumes for the same price. But in true steampunk fashion, you have to be inventive. This is just how I used what we had and made it work. You don't even have to order gears online. You can use what you have and what you find.


Here's what we used that we already owned:
(Some of these I planned on using, some were last minute solutions)
Pocket Watch- one of DH's grandfather's
Vest & Tank
White collared shirts
Slacks
Shoes (DH actually bought some for the costume, but they didn't fit right)
Old and broken jewelry that my mom had given me awhile ago
Bra (yep, this got a lot of laughs, I used the straps for DH's goggles)
Purse (one that the dog had eaten)
Spray Paint
Soda Bottle
Compass
Hot Glue
Needle & Thread

Here's what we bought, mostly from the thrift store:
Leather Jacket-$6
Old Clock-$2
Hats-$8
Sunglasses-$6
Eye Shadow-$1 from the dollar store
Belt- $3
Misc Toys that we hoped had some gears- $4
Apron-$3

Technically I also bought Velcro dots for $8 from Walmart. That was because I waited until the last minute and didn't have time to sew things. I hated how they worked, and they have been replaced with hot glue.

We got some encouraging feedback from people at the con. While some of them had been doing it for years, and put a lot of money, time and talent into their costumes, they still liked what we had done. It's the thought you put into that shows.

Here's what we started with:

We wound up not using the binoculars, but this was the look I first imagined when we started the costumes.
The hat cost $4 and was actually for a woman. The sunglasses cost under $2 and were actually baseballs.


The most comments I got were about DH's hat.


We were going for a bowler hat, and I think this wound up looking pretty close.
There's the last minute bra straps that I added to his goggles (don't worry, it was on its way to the garbage anyway). The leather strap around it is from my dog-eaten purse. The thing people really liked was the gold details on the side. The bases were from a belt I bought for $3. On top, I glued some springs and nuts I found in the bottom of the toolbox. I spray painted a few plastic gears and car wheels and added those too. Then I just hot glued everything to the hat.
DH also teased out his hair, and I painted on grey eye shadow on his face to look like soot.


I also put some old jewelry to good use.


I broke up a chain into segments, added some painted plastic gears, and stuck them onto the brooch from my mom. I also took a small heart locket from my mom and added an old, cheap, beat-up chain.


I wanted my 'persona' to be a tinkerer. With short hair, pants, and soot on my face, I thought a little feminine touch to my hat would be nice. 


Here's DH. The apron actually had something like "kiss the cook" on the front. So he wore it backwards. You could still see the writing a little, so I cut the pocket off the leather jacket and sewed it to the front. Since I can't sew that well,  it wound up not centered.  So, I added another little strip to the side. One of the Steampunk panel presenters actually liked how I had off-centered the pocket. ( I totally pretended like it was a well-thought decision after that)  We tucked a compass and a pocket watch into the apron pockets to show they're practical. The jacket was made of 2" leather strips, so it was really easy to rip apart and make these no-sew bracers.


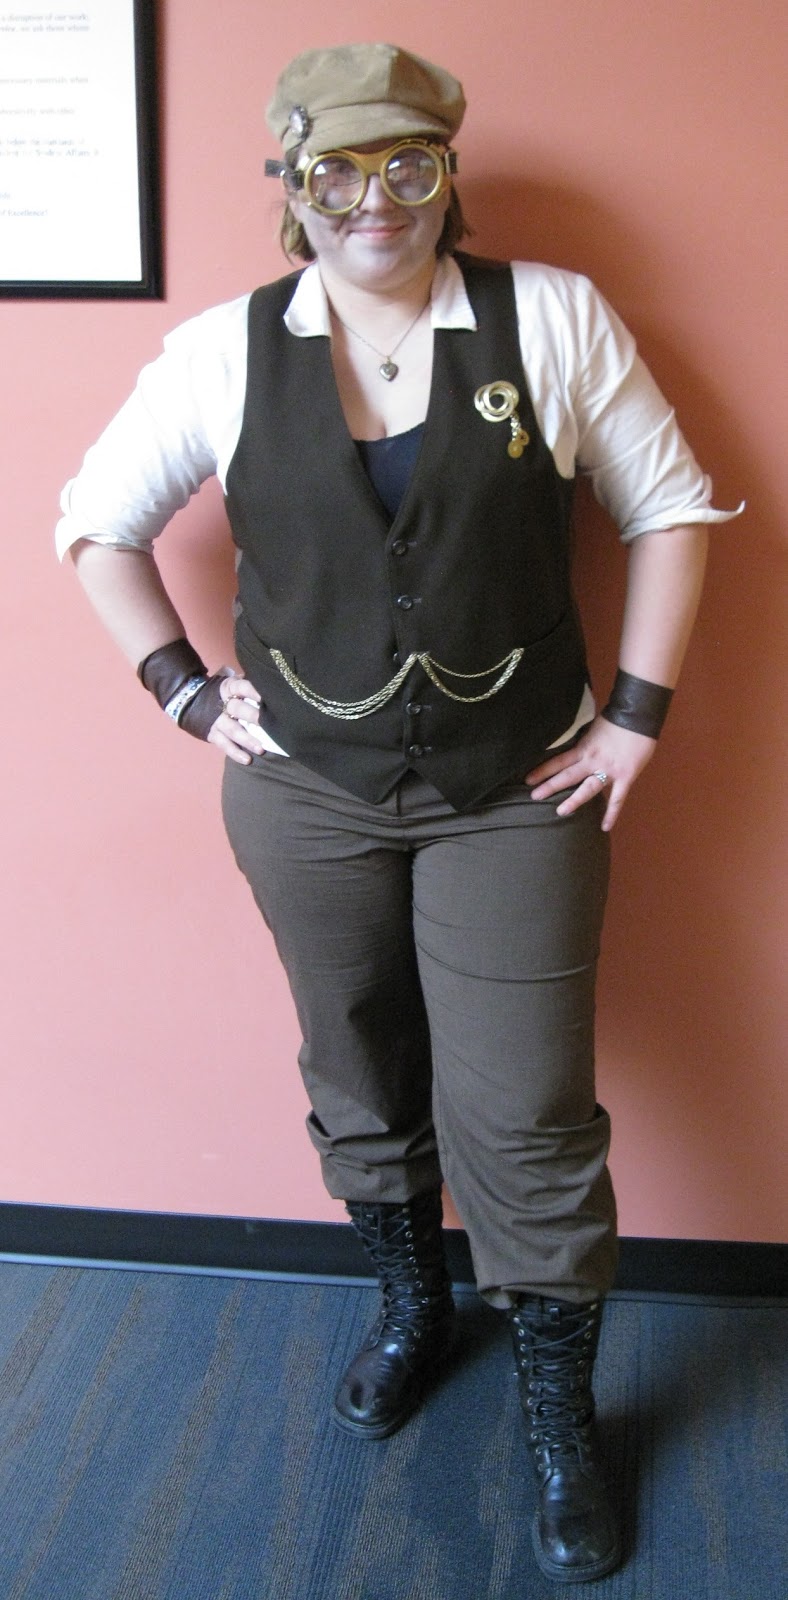
I love these boots! I actually bought them for $1 a few years ago for a costume, and they keep coming in handy. I tucked my pants into my boots of course. The 'practical bloomer' as someone said. Remember, pants weren't the norm in the Victorian era. So I didn't want to wear them like a boy would. I pinned my shirt open because, well why not? The bracer on my right hand is a leather strip from around the sleeve. It was already pointed, so I wrapped it around and sewed a ring of chain to it. That way I could slip it over my finger. I wear glasses, so it was important to have goggles that I could wear. I painted the sunglasses and popped out the lenses. Then I cut replacement lenses from a 2 liter bottle. I hot glued my purse straps to the back. I also found a 3-chain choker in my stash of vintage jewelry, so that got pinned into my vest. It gives the illusion of a watch. 


Sorry this isn't a detailed how-to. I didn't think the costumes would come out as well as they did. We met some other long-time Steampunkers there-the con actually had them do a panel, which was great.
They were very nice, and so encouraging. But when someone asked how much it costs to get started in making a Steampunk costume, the veterans (who hand make their very nice costumes) went into a lot of detail. So, I stood up and said, this is our first time doing costumes, and I spent about $30 for both of us. That got some "oh wow"s and "really?"s. Then we had to stand in front of the class while the speaker went over our costumes. Some of the things he mentioned were nice touches:
the soot on our face, DH's hat, my tucked in pants.


I think we only got away with spending so little because of our personas. If we were trying to portray the upper-class, our costumes would have needed more pomp and circumstance. Everything that got comments were the little details, which made me feel great. A tip I picked up is to make one central piece of interest, and make the rest of the costume backdrop. I really want to make some kind of tinkerer's glove in the future, so that will be my central piece. 
We've joined a Steampunk group in the area, and I'm excited to further develop our costumes and characters. 

-DearLadyDisdain